Drush 8: quick passwordless site syncing and other time savers for Drupal developers
A little while ago I wrote a guide on installing Drush 8 on Debian or Ubuntu and touched briefly on some of the functionality Drush has to offer. I now want to show you how to configure Drush to quickly sync your databases and files. I'll also point out a few other time savers along the way that I use in my daily work as a Drupal developer. If you are working on many sites, some of these tricks can shave significant time off your week.
I'm going to start at the beginning and build up from there. Each step adds new functionality to your setup so any part of this you do will be useful.
Drush 8 is quite stable now. If you aren't using a recent version, you're missing out on some great features. Go install it now. I'll wait. Okay, ready?
Assumptions
I'm assuming you're working with a local Linux-like development environment with a bash shell and a similar production server. You're using Git and have multiple Drupal sites installed. I know most of this will work on a Mac as well but I haven't tested it all.
$ drush init
The first thing you should do after you install Drush is this:
$ drush init
This command will ask you if you want to let Drush modify your .bashrc (say yes - I've never had a problem but it's probably good practice to back it up first) and create a file called drushrc.php in your ~/.drush directory. This file contains a lot of helpful configuration options. It's a good exercise to go though that entire file once you've worked with Drush for a while but I'll point you to a couple of key things you'll want to do in the mean time.
After you run the command, log out and back in again. Change directory (cd) to one of your sites. If the directory is under Git, your prompt should now show you which branch you are on and include a status indicator to show if you have made any modifications the repository like so:
ron@peachy /var/www/mysite.local (master=) $
In the case above, the '=' shows that there have been no changes to the master branch. In the case below, the '*=' indicates I have modified files on the file system. Handy, right?
ron@peachy /var/www/mysite.local (master*=) $
Local and remote site aliases
In your ~/.drush directory on your local development box, you can create a file called aliases.drushrc.php. This is where things start getting interesting and is the key to many of the other tips I'm going to show you. These will allow you to refer to your sites as aliases such as @mysite-local. I typically shorten the local alias to just @mysite or even something like @ms but I'll leave it longer here for clarity. Here's an example:
<?php

$aliases['mysite-local'] = array (
    'uri' => 'mysite.local',
    'root' => '/var/www/mysite.local',
    '#live' => '@mysite-prod',
);

$aliases['mysite-prod'] = array(
 'remote-host' => 'prod.mysite.com',
 'remote-user' => 'prod_ssh_user_name',
 'ssh-options' => '-p22222',
 'root' => '/prod/site/public_html',
 'uri'  => 'prod.mysite.com',
 'path-aliases' => array(
    '%drush' => '/usr/local/bin',
    '%drush-script' => '/usr/local/bin/drush',
  )
);
Notes:
- You'll typically have dozens of these aliases.
- Don't use '~' or other symbolic links in your aliases. They don't work. Just type it out. It's the last time you'll have to do that.
- '#live' is optional for local work but it connects your local/development site to your production site. Later, I'll provide examples to show how powerful that can be.
- '-p' is the port. It's optional and defaults to 22.
- 'path-aliases' indicates the path to Drush on the production site.
- If you look at older examples of Drush remote aliases, you'll notice they often have a "%files" key in the 'path-aliases' array. That is deprecated for Drush 8 and can mess things up. Leave it out. Drush will figure out where your files are from your Drupal configuration.
- The rest seems mostly obvious to me but if it isn't, leave a comment and I'll try to clarify.
Once you have the aliases set up correctly for each site, you can get a list of your aliases like this:
$ drush sa
or even just:
$ sa
You can now use the aliases to do things like clear the cache from anywhere on the file system. Instead of having to use:
$ drush -l mysite.local cc all
You can use:
$ drush @mysite-local cc all
Note: use 'cr' instead of 'cc' for Drupal 8
Okay, that didn't save us much typing but it get's better. Hang in there.
With your aliases set up, you can now run many Drush commands against your production site from your local...for example, check for module updates:
$ drush @mysite-prod ups
Creating and restoring local database files
You are now ready to dump (first example) and/or restore (second example) a database from a local file without needing to enter a password:
$ drush @mysite-local sql-dump > ~/backups/mysite.date.sql (dump the database to a file)
$ drush @mysite-local sqlc < ~/backups/mysite.date.sql (restore the database from a file)
That's cool but if you're like me, you probably dump your databases several times a day. So let's make that even easier. This is where we go back to our drushrc.php file in our ~/.drush directory.
Open that file up and look for $options['result-file']. There should be two matches. We want to update the path in the second option to reflect where you want your backups to go. Mine looks exactly like this:
$options['result-file'] = '/home/ron/backups/@DATABASE_@DATE.sql';
Once you've saved that file, we can run this:
$ drush @mysite-localsql-dump
Drush knows where to put the file and how to name it so creates this:
/home/ron/backups/mysite_20170602_052824.sql
We can also add a --gzip flag like this:
$ drush @mysite-local sql-dump --gzip
Which results in this instead:
/home/ron/backups/mysite_20170602_052824.sql.gz
A side benefit of this is that all of your backups end up in the same directory instead of scattered about. It's much easier to clean up if you start running out of space.
Synchronize from a remote database
You can also update your local database with a copy of the current production database. When you run this, read the prompts carefully. You can overwrite your production database if you aren't careful! The format is:
$ drush sql-sync <@site-to-copy-from> <@site-to-copy-to>
So, using our example:
$ drush sql-sync @mysite-prod @mysite-local
At this stage, you will still be asked for the password of the remote SSH user several times. We'll fix that later.
Synchronize from remote files
So now you have the latest database but your front page is a mess because you don't have the images and other files from the latest production site content. No problem. If we add the following alias to our ~/.drush/drushrc.php file...
$options['shell-aliases']['pull-files'] = '!drush rsync {{#live}}:%files {{@target}}:%files';
Then we can run the command...
$ drush @mysite-local pull-files
...to rsync the files from #live which is @mysite-prod in the example above. Sweet.
Synchronize from a remote database and files
Let's go one better still by adding this next command to our dushrc.php...
$options['shell-aliases']['pull-data'] = '!drush sql-sync {{#live}} {{@target}} && drush rsync {{#live}}:%files {{@target}}:%files';
...which allows us to do this...
$ drush @mysite-local pull-data
...which will sync the database and then the files all in one go.
Passwordless SSH
Now the last annoying issue with our setup so far is that Drush needs to log you in to the remote server via SSH to run commands like these so you will get asked for a password each time. Several times for data syncing. So how do you avoid that?
Passwordless SSH to the rescue. By creating a local SSH key and uploading the public part of the key to the remote server, you can run all of these remote commands without having to enter a password. There are several good tutorials out there on how to do this so I won't recreate them here. This is one that I go back to from time to time.
The one thing to note about this tutorial...they suggest that you put a password on your SSH key when you create it. That is only really necessary if you want to add an extra layer of protection on the key, say if you were creating it on a shared server. Otherwise, that step isn't strictly necessary. If you do put a password on the key, you will need to follow the steps at the bottom of that tutorial and use ssh-add and ssh-agent to hold the password in memory.
Other fun stuff
Well...I don't know about fun but anyway, let's see what else we can do.
Never SSH to a site again
Another benefit of the site aliases we configured earlier is that you can now just run the following command to 'cd' you to the web root of the @mysite-local site:
$ cdd @mysite-local
And, now that you also have passwordless SSH configured, we can once again simplify the process of getting to your remote files. Instead of doing this...
$ ssh user_name@mysite-remote.server.name
$ cd /path/to/mysite-remote
You can just to this (again, from your local):
$ cdd @mysite-prod
Drush and cron
You know how when you haven't loaded a site in a while and the first load can take forever? That can be caused by Drupal spinning up a cron task. In fact, Drupal (7 at least) runs a cron hook on every page load to see if cron has run recently. This is not only super annoying, I've seen how this can add a drastic amount of load on high traffic sites. To get around this, turn off Drupal's cron and create a cron job so that cron runs asynchronously.
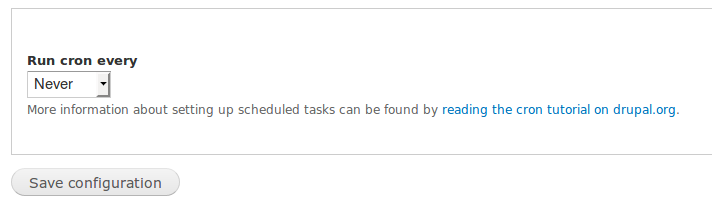
On Drupal 7 and 8, cron settings can be found at /admin/config/system/cron. Set the time to "Never" and save. Drupal won't fire the cron hook any more.
Then, go to your shell and edit your crontab which edits the cron jobs that run locally:
$ crontab -e
Add this line to update your sites cron jobs every hour on the hour:
0 * * * * /usr/local/bin/drush @mysite-local --quiet cron
...where '/usr/local/bin/drush' is the path to your local drush installation. Just remember to check back after an hour to the Drupal cron admin page to make sure cron is still working.
Documentation
Keep the Drush documentation site handy. Refer back there when you need more details. It's a super-helpful resource.